首页 › 分类存档 › 未分类

单例模式

单例:确保一个类只有一个实例,并要求提供一个全局的访问点。

要点:
(1)构造私有化,确保不能被外界new。
(2)只能通过全局访问点进行访问,以返回单个实例。
单例的好处:
(1)节省内存,因为限制了实例的个数。
(2)有利于垃圾回收。

private Singleton(){
}
private static Singleton singleton = new Singleton();
public static Singleton getSingleton(){
return singleton;
}

这种做法在JVM加载类的时候马上就会创建此类的唯一实例,保证访问静态变量singleton 之前,一定创建好此实例。(饿汉法)

private Singleton(){
}
private static Singleton singleton = null;
public static Singleton getSingleton(){
if(singleton == null){
singleton = new Singleton();
}
return singleton;
}

首先利用静态变量singleton记录Singleton的实例,但是用实例时,若不存在,则利用私有构造器创建一个实例并将其赋值到singleton静态变量。如果不需要这个实例,则永远不会产生。

singleton

nginx预置全局变量

经常需要配置Nginx ,其中有许多以 $ 开头的变量,经常需要查阅nginx 所支持的变量。

可能是对 Ngixn资源不熟悉,干脆就直接读源码,分析出支持的变量。

Nginx支持的http变量实现在 ngx_http_variables.c 的 ngx_http_core_variables存储实现:

ngx_http_core_variables
static ngx_http_variable_t  ngx_http_core_variables[] = {

{ ngx_string(“http_host”), NULL, ngx_http_variable_header,
offsetof(ngx_http_request_t, headers_in.host), 0, 0 },

{ ngx_string(“http_user_agent”), NULL, ngx_http_variable_header,
offsetof(ngx_http_request_t, headers_in.user_agent), 0, 0 },

{ ngx_string(“http_referer”), NULL, ngx_http_variable_header,
offsetof(ngx_http_request_t, headers_in.referer), 0, 0 },

#if (NGX_HTTP_GZIP)
{ ngx_string(“http_via”), NULL, ngx_http_variable_header,
offsetof(ngx_http_request_t, headers_in.via), 0, 0 },
#endif

#if (NGX_HTTP_PROXY || NGX_HTTP_REALIP)
{ ngx_string(“http_x_forwarded_for”), NULL, ngx_http_variable_header,
offsetof(ngx_http_request_t, headers_in.x_forwarded_for), 0, 0 },
#endif

{ ngx_string(“http_cookie”), NULL, ngx_http_variable_headers,
offsetof(ngx_http_request_t, headers_in.cookies), 0, 0 },

{ ngx_string(“content_length”), NULL, ngx_http_variable_header,
offsetof(ngx_http_request_t, headers_in.content_length), 0, 0 },

{ ngx_string(“content_type”), NULL, ngx_http_variable_header,
offsetof(ngx_http_request_t, headers_in.content_type), 0, 0 },

{ ngx_string(“host”), NULL, ngx_http_variable_host, 0, 0, 0 },

{ ngx_string(“binary_remote_addr”), NULL,
ngx_http_variable_binary_remote_addr, 0, 0, 0 },

{ ngx_string(“remote_addr”), NULL, ngx_http_variable_remote_addr, 0, 0, 0 },

{ ngx_string(“remote_port”), NULL, ngx_http_variable_remote_port, 0, 0, 0 },

{ ngx_string(“server_addr”), NULL, ngx_http_variable_server_addr, 0, 0, 0 },

{ ngx_string(“server_port”), NULL, ngx_http_variable_server_port, 0, 0, 0 },

{ ngx_string(“server_protocol”), NULL, ngx_http_variable_request,
offsetof(ngx_http_request_t, http_protocol), 0, 0 },

{ ngx_string(“scheme”), NULL, ngx_http_variable_scheme, 0, 0, 0 },

{ ngx_string(“request_uri”), NULL, ngx_http_variable_request,
offsetof(ngx_http_request_t, unparsed_uri), 0, 0 },

{ ngx_string(“uri”), NULL, ngx_http_variable_request,
offsetof(ngx_http_request_t, uri),
NGX_HTTP_VAR_NOCACHEABLE, 0 },

{ ngx_string(“document_uri”), NULL, ngx_http_variable_request,
offsetof(ngx_http_request_t, uri),
NGX_HTTP_VAR_NOCACHEABLE, 0 },

{ ngx_string(“request”), NULL, ngx_http_variable_request_line, 0, 0, 0 },

{ ngx_string(“document_root”), NULL,
ngx_http_variable_document_root, 0, NGX_HTTP_VAR_NOCACHEABLE, 0 },

{ ngx_string(“realpath_root”), NULL,
ngx_http_variable_realpath_root, 0, NGX_HTTP_VAR_NOCACHEABLE, 0 },

{ ngx_string(“query_string”), NULL, ngx_http_variable_request,
offsetof(ngx_http_request_t, args),
NGX_HTTP_VAR_NOCACHEABLE, 0 },

{ ngx_string(“args”),
ngx_http_variable_request_set,
ngx_http_variable_request,
offsetof(ngx_http_request_t, args),
NGX_HTTP_VAR_CHANGEABLE|NGX_HTTP_VAR_NOCACHEABLE, 0 },

{ ngx_string(“is_args”), NULL, ngx_http_variable_is_args,
0, NGX_HTTP_VAR_NOCACHEABLE, 0 },

{ ngx_string(“request_filename”), NULL,
ngx_http_variable_request_filename, 0,
NGX_HTTP_VAR_NOCACHEABLE, 0 },

{ ngx_string(“server_name”), NULL, ngx_http_variable_server_name, 0, 0, 0 },

{ ngx_string(“request_method”), NULL,
ngx_http_variable_request_method, 0,
NGX_HTTP_VAR_NOCACHEABLE, 0 },

{ ngx_string(“remote_user”), NULL, ngx_http_variable_remote_user, 0, 0, 0 },

{ ngx_string(“body_bytes_sent”), NULL, ngx_http_variable_body_bytes_sent,
0, 0, 0 },

{ ngx_string(“request_completion”), NULL,
ngx_http_variable_request_completion,
0, 0, 0 },

{ ngx_string(“request_body”), NULL,
ngx_http_variable_request_body,
0, 0, 0 },

{ ngx_string(“request_body_file”), NULL,
ngx_http_variable_request_body_file,
0, 0, 0 },

{ ngx_string(“sent_http_content_type”), NULL,
ngx_http_variable_sent_content_type, 0, 0, 0 },

{ ngx_string(“sent_http_content_length”), NULL,
ngx_http_variable_sent_content_length, 0, 0, 0 },

{ ngx_string(“sent_http_location”), NULL,
ngx_http_variable_sent_location, 0, 0, 0 },

{ ngx_string(“sent_http_last_modified”), NULL,
ngx_http_variable_sent_last_modified, 0, 0, 0 },

{ ngx_string(“sent_http_connection”), NULL,
ngx_http_variable_sent_connection, 0, 0, 0 },

{ ngx_string(“sent_http_keep_alive”), NULL,
ngx_http_variable_sent_keep_alive, 0, 0, 0 },

{ ngx_string(“sent_http_transfer_encoding”), NULL,
ngx_http_variable_sent_transfer_encoding, 0, 0, 0 },

{ ngx_string(“sent_http_cache_control”), NULL, ngx_http_variable_headers,
offsetof(ngx_http_request_t, headers_out.cache_control), 0, 0 },

{ ngx_string(“limit_rate”), ngx_http_variable_request_set_size,
ngx_http_variable_request_get_size,
offsetof(ngx_http_request_t, limit_rate),
NGX_HTTP_VAR_CHANGEABLE|NGX_HTTP_VAR_NOCACHEABLE, 0 },

{ ngx_string(“nginx_version”), NULL, ngx_http_variable_nginx_version,
0, 0, 0 },

{ ngx_string(“hostname”), NULL, ngx_http_variable_hostname,
0, 0, 0 },

{ ngx_string(“pid”), NULL, ngx_http_variable_pid,
0, 0, 0 },

{ ngx_null_string, NULL, NULL, 0, 0, 0 }
};

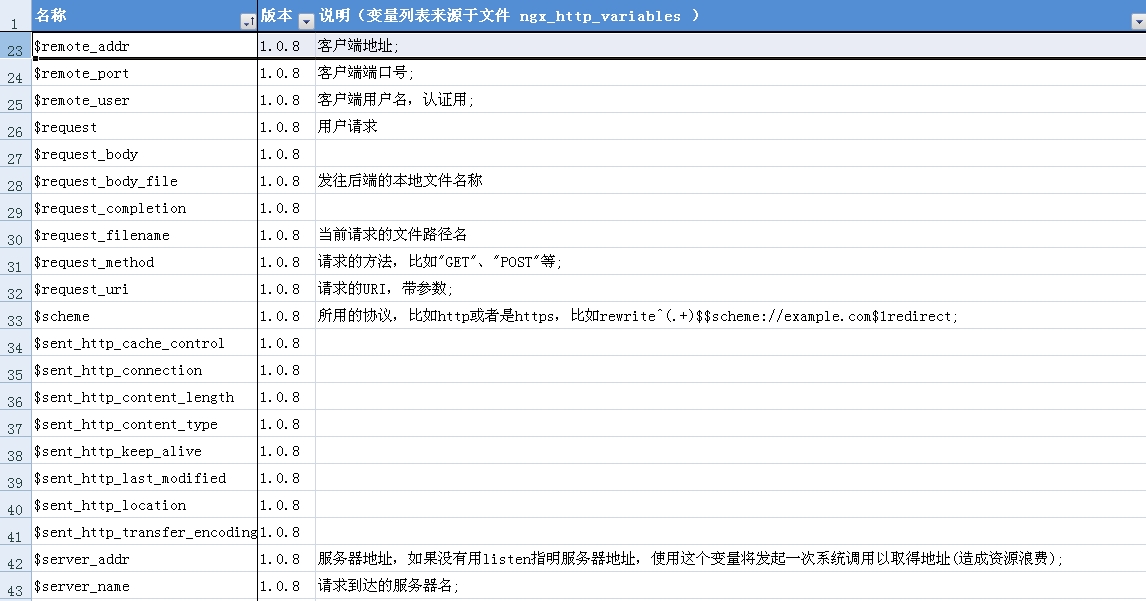
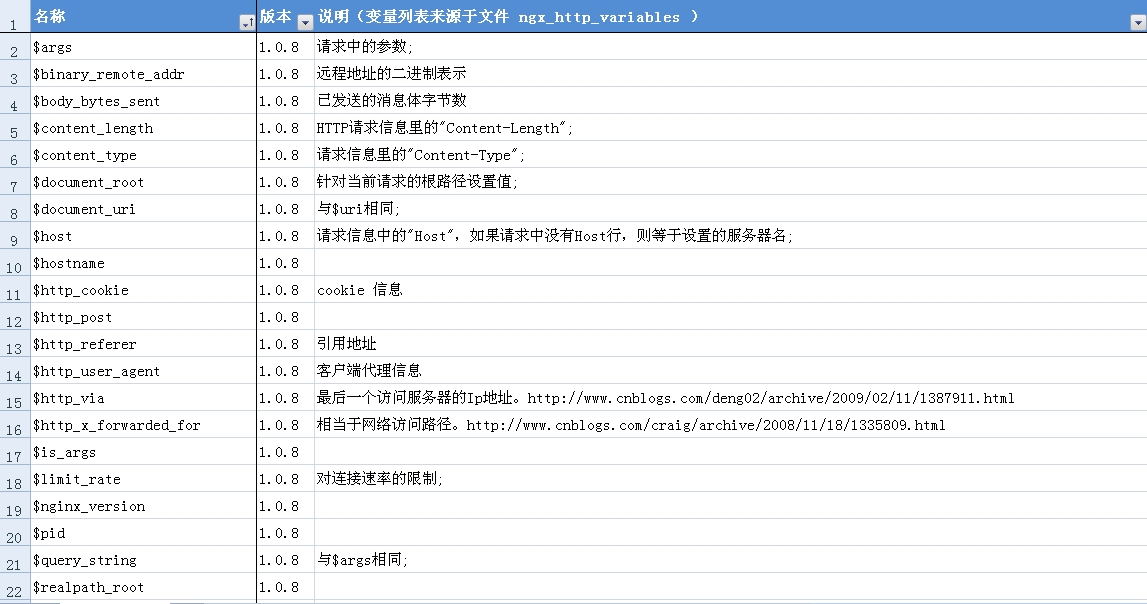
把这些变量提取下,总结如下:
2011121019182787nginx_args1

2011121019182787nginx_args2

2011121019182787nginx_args3

nginx内置变量

centos5.4安装convirt管理虚拟机

利用convirt通过web图形化管理虚拟机也是一种方便的方法,适用于Fedora/RHEL/CentOS

convirt官网:http://www.convirture.com

http://www.convirture.com/wiki/index.php?title=C2_fedora_installation

1、先确认服务器已安装wget,没安装时需安装

#yum install wget socat

2、更新安装所需的源

###5.0的源###

#cd /etc/yum.repos.d
#wget –no-cache http://www.convirture.com/repos/definitions/rhel/5.x/convirt.repo

###6.0的源###

wget –no-cache http://www.convirture.com/repos/definitions/rhel/6.x/convirt.repo

3、设置代理

export http_proxy=”http://company-proxy-server:80

4、下载安装所需的文件

wget –no-cache http://www.convirture.com/downloads/convirt/2.0.1/convirt-install-2.0.1.tar.gz
wget –no-cache http://www.convirture.com/downloads/convirt/2.0.1/convirt-2.0.1.tar.gz
wget –no-cache http://www.convirture.com/downloads/convirture-tools/2.0.1/convirture-tools-2.0.1.tar.gz

5、解压安装文件

#tar -xzf convirt-install-2.0.1.tar.gz

6、开始安装

#cd convirt-install/install/cms/scripts/
# ./install_dependencies

安装完成后会提示连接数据库的一些信息,根据提示操作即可

7、添加数据库信息并重启数据库

#vim /etc/my.cnf

[mysqld]
datadir=/var/lib/mysql
socket=/var/lib/mysql/mysql.sock
user=mysql

##添加以下两行
innodb_buffer_pool_size=1G
innodb_additional_mem_pool_size=20M

#/etc/init.d/mysqld restart

8、安装convirt

设置代理

#export http_proxy=”http://company-proxy-server:80″

修改convirt-install-2.0.1的安装信息

#vim convirt-install/install/cms/scripts/install_config

CONVIRT_BASE=~

改成

CONVIRT_BASE=~/cms

##需先在用户目录下新建文件夹cms,用来把convirt-2.0.1解压到该文件夹下

解压convirt-2.0.1

#source convirt-install/install/cms/scripts/install_config
#tar -xzf ./convirt-2.0.1.tar.gz -C $CONVIRT_BASE


安装 TurboGears

#./convirt-install/install/cms/scripts/setup_tg2

设置convirt数据库连接信息

#vim cms/convirt/src/convirt/web/convirt/development.ini

##修改以下信息

sqlalchemy.url=mysql://root:convirt@localhost:3306/convirt?charset=utf8

运行安装

#./convirt-install/install/cms/scripts/setup_convirt

需允许端口通过

#iptables -I INPUT -p tcp –dport 8081 -j ACCEPT

9、启动

#cd ~/convirt
#./convirt-ctl start

10、打开页面

http://ip:8081

用了神器socat,在公司终于可以上豆瓣电台听音乐了~

我在的公司上不了网。那查资料怎么办?别急,有公共上网机,大家可以远程桌面上去,在那上边上,需要下载资料了,现放到上网机上,再ftp下 来。原则上只能查资料,可我明明白白看大家都在上边看新闻,浏览网页,甚至是上webqq.所以,实际上是可以上网的,典型的掩耳盗铃做法,是不?都心知 肚明,却谁也不能说破,这就是传说中的暗规则吧。
这样挺好。可有一点不好,就是听不了评书和音乐。对于我这种习惯戴着耳机干活 的人感觉很不适应。远程桌面设过将声音带到本地,可不起作用。也曾想过偷偷装个代理服务器,装个squid,可总觉得这样太小题大做了,而且我也不懂;也 想到过写个小程序,来转发,可上边没有java环境,单单为了这么点东西装个好几十兆的jvm,有点太那啥了,况且,还不一定能行—-如果上网机直连 的互联网,那肯定没问题—-但是上网机也是走的代理,代理协议没研究过啊,不知道浏览器中设置的ip地址会不会带到数据包里,是的话肯定虾米。我想找 个越低调越好的解决办法。
今天工作是需要开端口的,我想到了网络应用届的“瑞士军刀”nc。等忙完后闲得难受,都说nc功能强大,有没有转发的功能呢?nc不熟,但我意识到,肯定有,可怎么来用呢,用上后能用来上网吗?试试吧。想当然的想起了个土鳖办法:
nc -L -p 1234 | nc 代理服务器ip地址 端口.
我 的本意是,nc把监听到的数据写到流里,这样就把数据转给代理服务器了。在本地浏览器里设好代理服务器地址为上网机地址,在地址栏里敲入豆瓣的网址,呵 呵,直接没反应。失败鸟,不过我很振奋,因为我关掉浏览器时,在控制台上看到了一屏html的数据,意思好想是超时,不是通常的“你无权访问,请联系管理 员云云”,嗯,看来这种方法有可能是可行的。在看刚才敲入的命令,看出来了问题所在,发出去的数据是转给代理服务器了,可回来的数据怎么回写到本机啊?不 懂鸟,网上查查吧。
却也没想象的那么容易查,翻了一屏也没找到想要的东西,却找到了socat这个神器。它有个功能是专门满足这种需求的,敲入指令:
socat TCP4-LISTEN:1234,reuseaddr,fork, TCP4:代理服务器ip地址:端口
在本机再一刷网页,成功鸟。打开douban.fm,耳机里传来范玮琪动听的声音,哈哈,亲爱的,你终于回来了。
不感肯定这么做是不是自做聪明,不过我低调处理的话,相信没有人会注意到。

ConVirt 2.0.1中文版

convirt

最近花点时间作了一下ConVirt 2.0.1社区版的汉化工作,现按照ConVirt 2.0.1社区版所使用的GPLv2授权协议发布出来。欢迎各位正在研究/使用云计算相关技术的朋友试用并提出宝贵意见。

除了本人之外,天涯社区的李帅,Intel公司的王帅,以及搜狐的王蕾也参与了ConVirt 2.0.1社区版的汉化工作。在此向如上各位所付出的时间和精力一并表示感谢。
继续阅读 »

MySQL从服务器的监控

[root@db-server-61-001 script]# ll
total 4
-rwxr-xr-x 1 root root 294 Jun 20 03:38 check_mysql_slave
[root@db-server-61-001 script]# cat /software/script/check_mysql_slave
#!/bin/bash
declare -a slave_is
slave_is=($(mysql -uroot -pgb52054.GB@ -e “show slave status\G” |grep Running |awk ‘{print $2}’))
if [ “${slave_is[0]}” = “Yes” -a “${slave_is[1]}” = “Yes” ]
  then
  echo “OK -slave isrunning”
  exit 0
else
   echo “Critical -slave is error”
  exit 2
fi

[root@db-server-61-001 script]# ./check_mysql_slave
OK -slave isrunning

结构化命令2

1.test

if [ condition ]

then

commands

fi

1.1 test 数值比较

n1 -eq n2 # n1是否等于n2

n1 -ge n2 # n1是否大于或等于n2

n1 -gt n2 # n1是否大于n2

n1 -le n2 # n1是否小于或等于n2

n1 -lt n2 # n1是否小于n2

n1 -ne n2 # n1是否不等于n2

[root@db-grassroots-61-001 script]# cat 3
#!/bin/bash
val1=10
val2=11

if [ $val1 -gt 5 ]
then
  echo “The test value $val1 is greater then 5”
fi
if [ $val1 -eq $val2 ]
then
echo “The values are equal”
else
echo “The values are different”
fi

1.2 test 字符串比较

str1 = str2    #比较str1和str2是否相同

str1 != str2   #比较str1和str2是否不同

str1 < str2    #比较str1是否小于str2

str1 > str2    #比较str1是否大于str2

-n str1        # 比较str1的长度是否大于0

-z str1        # 比较str1的长度是否为0

结构化命令

1.if-then

if command

then

command

fi

[root@db-grassroots-61-001 script]# cat 2
#!/bin/bash
testuser=markgeng
if grep $testuser /etc/passwd
then
echo Then bash files for user $testuser are:
ls -a /home/$testuser/.b*
fi

2.if -then-else

if command

then

command

else

command

fi

[root@db-grassroots-61-001 script]# cat 2
#!/bin/bash
testuser=markgeng
if grep $testuser /etc/passwd
then
echo Then bash files for user $testuser are:
ls -a /home/$testuser/.b*
else
echo “The user name $testuser doesn’t exist on this system”

fi

3.嵌套if语句

if command1

then

commands

elif command2

then

more commands

fi

4.if-then -elif

if command1

then

command set 1

elif command2

then

command set 2

elif command3

then

command set 3

elif command4

then

  command set 4

fi

nginx location用法

语法规则: location [=|~|~*|^~] /uri/ { … }

= 开头表示精确匹配

^~ 开头表示uri以某个常规字符串开头,理解为匹配 url路径即可。nginx不对url做编码,因此请求为/static/20%/aa,可以被规则^~ /static/ /aa匹配到(注意是空格)。

~ 开头表示区分大小写的正则匹配

~* 开头表示不区分大小写的正则匹配

!~和!~*分别为区分大小写不匹配及不区分大小写不匹配 的正则

/ 通用匹配,任何请求都会匹配到。

多个location配置的情况下匹配顺序为(参考资料而来,还未实际验证,试试就知道了,不必拘泥,仅供参考):

首先匹配 =,其次匹配^~, 其次是按文件中顺序的正则匹配,最后是交给 / 通用匹配。当有匹配成功时候,停止匹配,按当前匹配规则处理请求。

例子,有如下匹配规则:

1
2
3
4
5
6
7
8
9
10
11
12
13
14
15
16
17
18
19
20
21
22
23
24
location = / {
#规则A
}
location = /login {
#规则B
}
location ^~ /static/ {
#规则C
}
location ~ \.(gif|jpg|png|js|css)$ {
#规则D
}
location ~* \.png$ {
#规则E
}
location !~ \.xhtml$ {
#规则F
}
location !~* \.xhtml$ {
#规则G
}
location / {
#规则H
}

那么产生的效果如下:

访问根目录/, 比如http://localhost/ 将匹配规则A

访问 http://localhost/login 将匹配规则B,http://localhost/register 则匹配规则H

访问 http://localhost/static/a.html 将匹配规则C

访问 http://localhost/a.gif, http://localhost/b.jpg 将匹配规则D和规则E,但是规则D顺序优先,规则E不起作用, 而 http://localhost/static/c.png 则优先匹配到 规则C

访问 http://localhost/a.PNG 则匹配规则E, 而不会匹配规则D,因为规则E不区分大小写。

访问 http://localhost/a.xhtml 不会匹配规则F和规则G,http://localhost/a.XHTML不会匹配规则G,因为不区分大小写。规则F,规则G属于排除法,符合匹配规则但是不会匹配到,所以想想看实际应用中哪里会用到。

访问 http://localhost/category/id/1111 则最终匹配到规则H,因为以上规则都不匹配,这个时候应该是nginx转发请求给后端应用服务器,比如FastCGI(php),tomcat(jsp),nginx作为方向代理服务器存在。

所以实际使用中,个人觉得至少有三个匹配规则定义,如下:

1
2
3
4
5
6
7
8
9
10
11
12
13
14
15
16
17
18
19
20
21
22
#直接匹配网站根,通过域名访问网站首页比较频繁,使用这个会加速处理,官网如是说。
#这里是直接转发给后端应用服务器了,也可以是一个静态首页
# 第一个必选规则
location = / {
proxy_pass http://tomcat:8080/index
}
# 第二个必选规则是处理静态文件请求,这是nginx作为http服务器的强项
# 有两种配置模式,目录匹配或后缀匹配,任选其一或搭配使用
location ^~ /static/ {
root /webroot/static/;
}
location ~* \.(gif|jpg|jpeg|png|css|js|ico)$ {
root /webroot/res/;
}
#第三个规则就是通用规则,用来转发动态请求到后端应用服务器
#非静态文件请求就默认是动态请求,自己根据实际把握
#毕竟目前的一些框架的流行,带.php,.jsp后缀的情况很少了
location / {
proxy_pass http://tomcat:8080/
}

未试验过的其他信息:

三、ReWrite语法
last – 基本上都用这个Flag。
break – 中止Rewirte,不在继续匹配
redirect – 返回临时重定向的HTTP状态302
permanent – 返回永久重定向的HTTP状态301
1、下面是可以用来判断的表达式:
-f和!-f用来判断是否存在文件
-d和!-d用来判断是否存在目录
-e和!-e用来判断是否存在文件或目录
-x和!-x用来判断文件是否可执行
2、下面是可以用作判断的全局变量
例:http://localhost:88/test1/test2/test.php
$host:localhost
$server_port:88
$request_uri:http://localhost:88/test1/test2/test.php
$document_uri:/test1/test2/test.php
$document_root:D:\nginx/html
$request_filename:D:\nginx/html/test1/test2/test.php
四、Redirect语法
server {
listen 80;
server_name start.igrow.cn;
index index.html index.php;
root html;
if ($http_host !~ “^star\.igrow\.cn$&quot {
rewrite ^(.*) http://star.igrow.cn$1 redirect;
}
}
五、防盗链location ~* \.(gif|jpg|swf)$ {
valid_referers none blocked start.igrow.cn sta.igrow.cn;
if ($invalid_referer) {
rewrite ^/ http://$host/logo.png;
}
}
六、根据文件类型设置过期时间
location ~* \.(js|css|jpg|jpeg|gif|png|swf)$ {
if (-f $request_filename) {
expires 1h;
break;
}
}
七、禁止访问某个目录
location ~* \.(txt|doc)${
root /data/www/wwwroot/linuxtone/test;
deny all;
}

++ 一些可用的全局变量
$args
$content_length
$content_type
$document_root
$document_uri
$host
$http_user_agent
$http_cookie
$limit_rate
$request_body_file
$request_method
$remote_addr
$remote_port
$remote_user
$request_filename
$request_uri
$query_string
$scheme
$server_protocol
$server_addr
$server_name
$server_port
$uri

使用进程锁来控制linux中的crontab执行的并发

在使用crontab同步一个文件夹时,发现一个问题,我在crontab中设置的1分钟运行一次.但当那个文件夹的内容改变时.1分钟不一定能同步完,但这时第二个rsync进行又起来了. 这个就产生一个问题,二个rsync一起处理相同的文件,这样会出问题.如下

1 1 * * * * /usr/bin/rsync -avlR /data/files 172.16.xxx.xxx:/data

本来想写个脚本来解决,但太麻烦.所以用了个linux下的锁..呵呵,象下面这个.

1 1 * * * * flock -xn /var/run/rsync.lock -c ‘ rsync -avlR /data/files 172.16.xxx.xxx:/data’

这样,使用flock的-x参数先建一个锁文件,然后-n指定,如果锁存在,就等待.直到建成功锁在会运行-c后面的命令.这样第一个进程没有运行完前,锁文件都会存在.这样就不会二个rsync同时并发处理一个东西了

也可以在代码里加入这一句,保证一个rsync进程运行就是了。。

pidNum=ps -ef |grep ‘rsync -参数’|grep -v grep |awk ‘{print $2}’|wc -l

if [ $pidNum -gt 0 ]; then exit